Contents
- Step 1 Selecting plans – Individual or Professional
- Step 2 Create your free Amazon Business Account
- Step 3 Select your business location and business type
- Step 4 Fill in personal information
- Step 5 Enter bank deposit account information and payment credit card information
- Step 6 Fill in the store information
- Step 7 Verification
The rise of the internet has revolutionized the way we conduct business, and e-commerce has become an integral part of our everyday lives. Among the numerous e-commerce platforms available, Amazon stands out as a global giant that has transformed the way people shop. Its user-friendly interface, vast product selection, and reliable customer service have made it a go-to platform for millions of online shoppers worldwide. According to recent statistics, by the end of 2022, an impressive 67% of users opted to browse and purchase gifts on Amazon. This staggering number highlights the immense potential and customer reach that the platform offers to businesses. Whether you’re an established brand or a budding entrepreneur, leveraging Amazon’s expansive customer base can significantly boost your sales and brand visibility.
If you have a passion for water bottles and want to tap into the ever-growing demand for eco-friendly and stylish hydration solutions, starting your own water bottle business on Amazon can be a smart move. With millions of customers actively searching for products on Amazon every day, you can gain instant exposure and access to a vast customer base that is ready to make purchases. However, before you can embark on your journey as an Amazon seller, there are certain prerequisites you must fulfill. The first and foremost requirement is to register for an Amazon seller account. This is why this article comes. In this article, we will teach you how to complete the registration process and gather the necessary documents and information. With a well-prepared Amazon seller account, you can start your entrepreneurial journey and take advantage of the numerous benefits offered by the platform.
Now please follow this article to register for your own Amazon account.
Step 1 Selecting plans – Individual or Professional

Before signing up, you must know the difference of the two plans. Cause if you click the orange “Sign up” button directly, you will be redirected to the registration page for a professional seller. This option is suitable for those looking to establish a more robust and scalable business on Amazon. On the other hand, if you click on the “See pricing” link, you will be provided with a comparison between individual and professional seller accounts. This will help you understand the distinctions between the two types of accounts and allow you to make an informed decision regarding your registration preference.
The individual seller account is designed for individuals who plan to sell fewer than 40 water bottles on Amazon. It is ideal for those starting out or planning to sell as a hobby. With an individual account, you pay a per-item fee for each sale, and there are certain limitations on the number of water bottles you can list.
On the other hand, the professional seller account caters to businesses and sellers who anticipate selling a large volume of products. With a professional account, you pay a monthly subscription fee, which grants you access to additional features and benefits. These include bulk listing and inventory management tools, advanced selling reports, the ability to create promotions and advertising campaigns, and eligibility for Amazon’s fulfillment services. By comparing the options and understanding the differences between individual and professional seller accounts, you can make an informed choice based on your specific business needs and goals. It is important to assess factors such as the volume of products you plan to sell, your budget, and the level of control and flexibility you require in managing your Amazon business.
Step 2 Create your free Amazon Business Account
Based on your own needs and choose corresponding channel of plan for signing up. Then enter your email and create a new account. Once you finish entering right codes, the link will be refreshed to the following page.
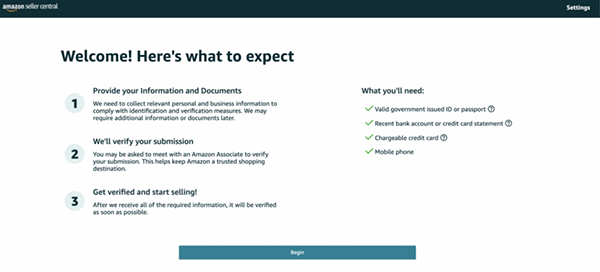
Follow Amazon’s guidance and prepare what you’ll need for your later registration.
- Valid government-issued ID or passport: Amazon requires you to provide a copy or details of a valid government-issued identification document such as a driver’s license, national ID card, or passport. This is to verify your identity during the registration process.
- Recent bank account or credit card statement: Amazon may request a recent bank account or credit card statement from you. This statement serves as proof of your financial information and helps establish your credibility as a seller or buyer on the platform.
- Chargeable credit card: You will need to have a credit card that can be charged for any applicable fees or transactions on Amazon. This means the credit card should have available credit and be authorized for online purchases.
- Mobile phone: Amazon may require you to provide a valid mobile phone number. This number is used for account verification purposes, such as receiving security codes or account-related notifications via SMS.
Step 3 Select your business location and business type
This is a step to provide essential details for Amazon to identify your business and associate it with your seller account or individual account, depending on your choice.
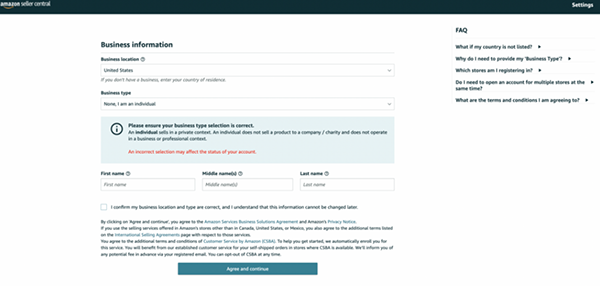
- Business location: You need to specify the country where your business is physically located. This information is crucial because Amazon will verify it later in the registration process (see step 7). It’s important to provide the accurate location to comply with Amazon’s policies and ensure proper registration.
- Business type: You will be asked to choose the type of business entity that best describes your business. Amazon offers several options, and most businesses fall into the “Privately-owned” . The available choices typically include:
- State-owned business: A business that is owned and operated by the government.
- Publicly-owned business: A business that is publicly traded and owned by shareholders.
- Privately-owned business: A business that is owned and operated by private individuals or entities.
- Charity: A nonprofit organization that operates for charitable purposes.
If you don’t have a registered business entity, you can choose this option “None, I am an individual”. However, Amazon will require your full name in the next step to associate with your individual account.

Click and read more about business gift sourcing: How to Purchase Corporate Promotional Gifts
Step 4 Fill in personal information
On the personal information page, you need to further provide the personal information of the legal representative of the account’s company. After selecting the nationality, proceed to enter or select the place of birth, date of birth, ID card number and expiration date, issuing country of the ID card, and the name on the ID card. If the residential address is different from the default company office address on the page, you can click the “Add Another Address” link to add a new address.
If the legal representative’s mobile phone number is different from the default phone number on the page, you can also click “Add New Phone Number” to add a new mobile number. Please note that the newly added phone number also needs to be verified through SMS or phone call.
Step 5 Enter bank deposit account information and payment credit card information
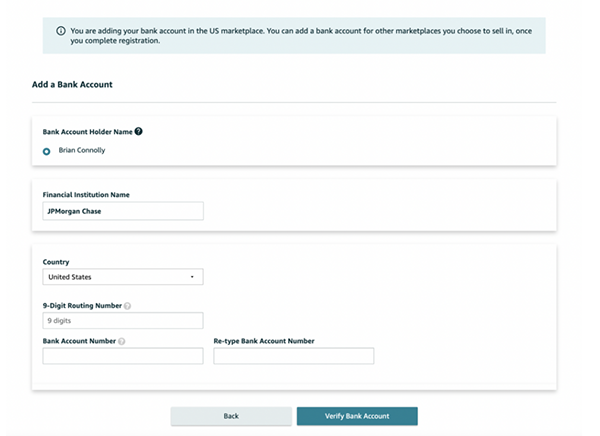
On this page, you need to enter the credit card number, expiration date, cardholder name, and billing address. Please use a credit card that supports international payments (VISA, MasterCard are both acceptable, VISA is recommended), otherwise, it may prompt that it doesn’t meet the requirements. Check if the default address information matches the billing address of the credit card. If they are different, please click “Add New Address” and enter the new address information. Besides, The credit card holder does not need to be the same person as the account registrant. Personal credit cards can also be used for company accounts (for European credit card information, it is recommended to use the credit card of the legal representative/beneficial owner).
During this step, please pay attention to the following notes:
- If the credit card billing address provided does not match the billing address provided to the bank, it may result in a failed account registration.
- After registration is completed and during the account operation process, you can change the credit card information at any time. However, frequent changes may trigger account reviews. It is recommended to consult seller support before making changes.
- This credit card will be used for account settlement when the seller account balance is insufficient to cover related fees. Amazon will deduct monthly fees or other selling costs such as FBA fees from this credit card.
- During the first six months, a monthly subscription fee of $39.99 will be charged for the Professional Selling subscription. Starting from the seventh month, regardless of where you sell, you will need to pay a total of no more than $39.99 (or equivalent currency) for the Professional Selling subscription that covers all marketplaces globally.
- If you receive an email notification after the account is approved and you log in to Seller Central, stating that the credit card information registered in the seller account is invalid, please check the following information:If address matches the billing address on the credit card statement exactly or verify with the issuing bank that the credit card has not expired, has sufficient credit limit, and has no restrictions on online or mail order payments.
Step 6 Fill in the store information
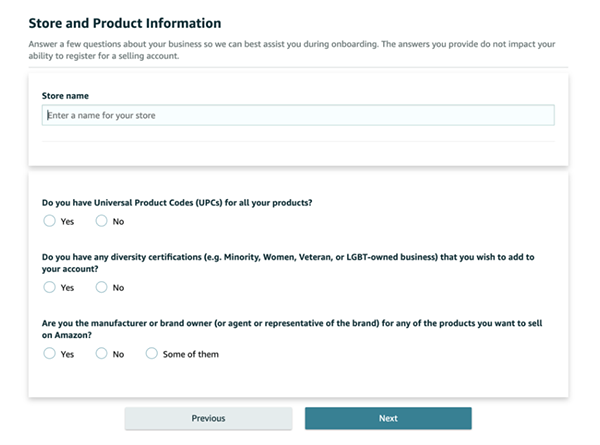
After providing your credit card information and having it validated, you will be asked a few questions about your Amazon store and the products you intend to sell. These questions are part of the registration process to gather important information about your store and the products you plan to sell on Amazon. Answer each question accurately based on your specific circumstances.
- The name of your Amazon store: You will need to provide a name for your Amazon store. This is the name that will be displayed to customers on Amazon. It’s important to note that you can change this name in the future if needed.
- Whether or not you have UPC codes for your product(s): UPC codes are unique product identifiers. You will be asked if you have UPC codes for the product(s) you plan to sell. If you’re unsure, it is generally recommended to click “Yes” for this question.
- If you have any diversity certifications: This question pertains to certifications related to diversity in business ownership, such as minority-owned business certifications. You will need to indicate whether you have any diversity certifications.
- If you are the manufacturer and/or brand owner of the product(s) you’re selling: You will be asked if you are the manufacturer and/or brand owner of the product(s) you intend to sell on Amazon. Select the appropriate option based on your situation.
Step 7 Verification
This is the last step for your account creation.
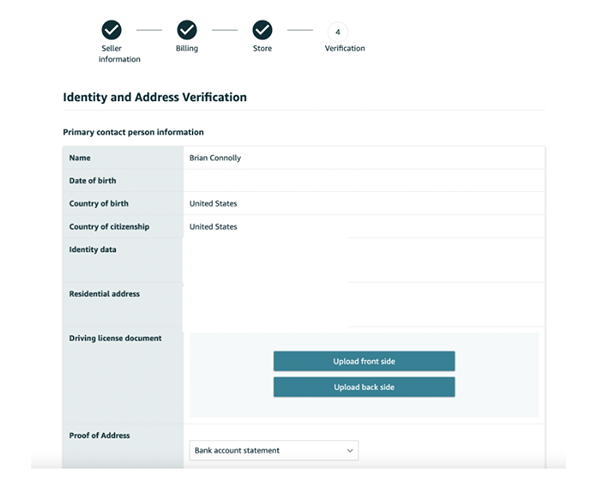
- Uploading documents: You will be asked to provide images of your identification documents such as a driver’s license or passport, as well as a bank statement. These documents are required to confirm your identity and establish your credibility as a seller.
- Clicking Submit: Once you have uploaded the required documents, you need to click the “Submit” button to proceed with the verification process.
- Identity Verification via video call: After submitting your documents, you will be required to complete an Identity Verification process through a video call. An Amazon associate will conduct the call to verify the authenticity of your documents and the accuracy of the personal information you provided during the application.
Here are two points needing your attention:
- Importance of timely completion: The statement emphasizes the importance of completing the verification process promptly so that you can start selling products on Amazon. It suggests doing it as soon as possible to avoid delays.
- Scheduling a video call: If you are unable to take the video call at the end of your application, you will have the option to schedule an appointment for a future date and time. This allows flexibility in completing the Identity Verification process.
After every step finished, you can have your own home page of the seller screen. Then you can start your legal sales of drink bottles / insulated tumblers / water jugs / thermos coffee cups / custom food containers / pet dog bowls / metal mugs / vacuum flasks etc on Amazon.

